Workflow Assistant
Abstract: The Workflow Assistant helps you to find the most important functions for a specific measuring or inspection tasks. It can help you access the most frequently used functions faster. By default, you find the tab Workflow Assistant in the right docking area next to the tab Properties (see Tech Guide – Workflow Assistant).
Workflow Assistant Object Types
The Workflow Assistant is built out of Workflow Assistant objects of different types, which can be categorized like this:
Pages – A page defines the main body of the Workflow Assistant. There is always exactly one active page. It may contain other Workflow Assistant objects.
MenuPage – Shows a list of Menu Entries.
WizardPage – Contains a list of Wizard Steps, which are executed sequentially.
EmbeddedCommandPage – Contains an embedded command dialog.
Menu Entries – Define the layout of a MenuPage.
NextPageEntry – Leads to a new page.
CommandEntry – Executes a command.
AccordionEntry – Contains a list of Menu Entries which can be collapsed and expanded.
Wizard Steps – Define the steps of a WizardPage
EmbeddedCommandStep – Contains one or more embedded command dialogs as a step.
Example
The ZEISS INSPECT built-in Workflow Assistant definition for the Inspection workspace is used as an example.
1. MenuPage
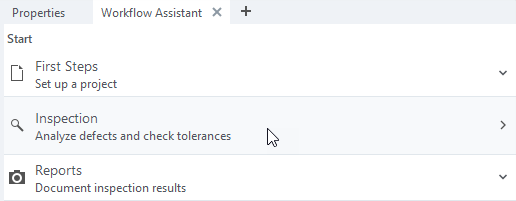
Inspection Workspace Workflow Assistant – “Start” MenuPage
This MenuPage consists of the entries “First steps” (AccordionEntry), “Inspection” (NextPageEntry) and “Reports” (AccordionEntry).
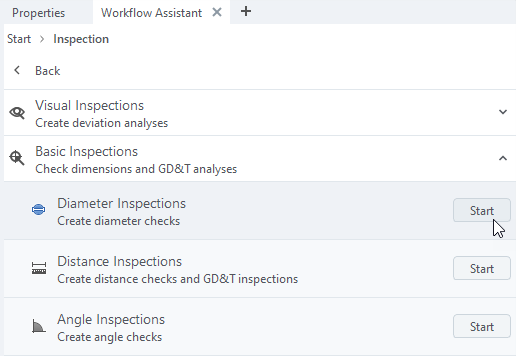
“Inspection” MenuPage – “Inspection” MenuPage
Expanding “Basic Inspections” (AccordionEntry) leads to “Diameter Inspections” (NextPageEntry), “Distance Inspections” (NextPageEntry) and “Angle Inspections” (NextPageEntry).
Note
The appearance of a NextPageEntry depends on the type of page it points to.
The “Inspection” NextPageEntry points to a MenuPage and has a right arrow, while the “Diameter Inspections” NextPageEntry points to a WizardPage and has a “Start” button, because it starts a Workflow.
Note

The “breadcrumbs” at the top of the Workflow Assistant show the current position in the menu structure. They can also be clicked to navigate back.
2. WizardPage
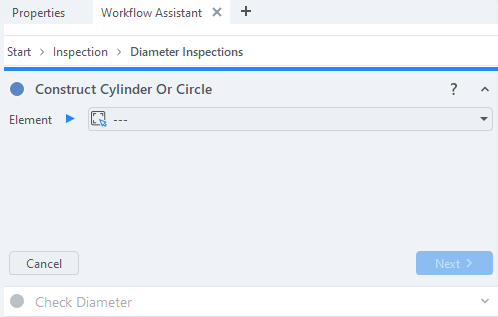
WizardPage, Wizard step 1 – “Construct Cylinder or Circle”
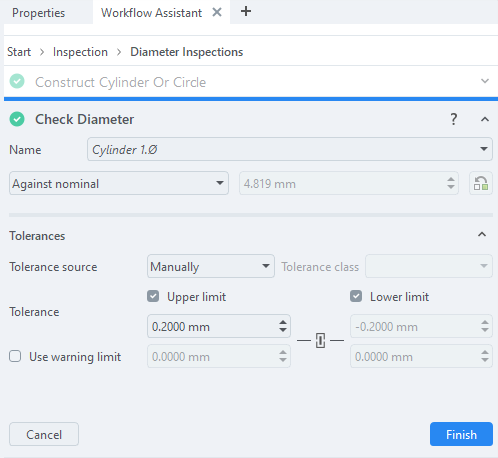
WizardPage, Wizard step 2 – “Check Diameter”
Starting “Diameter Inspections” shows a WizardPage with two steps:
Construct Cylinder or Circle
Check Diameter
Note
The wizard lets you continue to the next step only after you have completed the current step!
3. Embedded command page

Embedded command page – “Distance Quick Creation”
Starting “Distance Inspections” from the “Basic Inspections” MenuPage calls the script userscript.WorkflowAssistant__DistanceQuickCreation from the System App “Inspect”. This is the same as running Construct ► Distance ► Distance Quick Creation… from the main menu, but this way the dialog window is embedded in the Workflow Assistant.
Caution
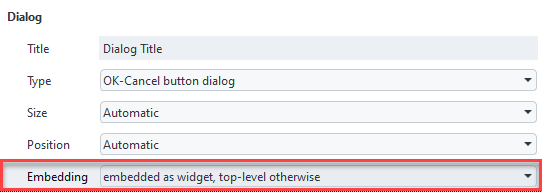
To embed a user-defined dialog, you must select “embed as widget, top-level otherwise” in the dialog properties using the Dialog Editor.
Creating a Workflow Assistant definition
Create a JSON file workflow_assistant/<assistant_name>/<assistant_name>.json in your App’s folder.
Note
A new JSON file cannot be created in the App Explorer yet. Go to your App folder in %APPDATA%/gom/<inspect_version>/gom_edited_addons and create the JSON file using an external editor instead.
Hint
To update the App Explorer, run
gom.script.sys.update_addon_database()from a Python script.To update the Workflow Assistant, switch to a different workspace and back again.
Minimal example
The “Minimal example” demonstrates the basic concept of creating a Workflow Assistant menu structure referencing built-in commands.
Note
See App Examples – WorkflowAssistants for complete source code.
The basic building blocks for the menu structure are:
-
A MenuPage with multiple entries that can be shown in the Workflow Assistant.
-
A menu entry that allows the user to navigate to another page
Uses ‘name’, ‘icon’ and ‘description’ of referenced page if not given explicitly.
-
This is used to display a single command in the Workflow Assistant.
-
A page to show multiple commands as a sequence in a wizard layout.
An EmbeddedCommandStep is used to represent each step
 1{
 2  "id": "8d7724f7-5cf3-4262-b39a-7228d69952e8",
 3  "name": "Minimal example",
 4  "using": [
 5    {
 6      "name": "inspect",
 7      "id": "bd0ec39e-4155-4d7d-9771-9ed0d5f86e59"
 8    }
 9  ],
10  "objects": [
11    // ...
12  ]
13}
At the top level, each Workflow Assistant definition must have a unique ID (UUID) (line 2) and a name
(line 3). With "using", an alias for a definition’s UUID can be defined to improve readability (l. 4…8).
The definition’s objects are listed under the "objects" tag (l. 10). They are the building blocks of this definition.
 1{
 2  // ...
 3  "objects": [
 4    {
 5      "type": "MenuPage",
 6      "id": "homepage",
 7      "name": "a minimal homepage",
 8      "entries": [
 9        {
10          "type": "NextPageEntry",
11          "page": "create_diameter"
12        },
13        {
14          "type": "EmbeddedCommandPage",
15          "description": "Custom description for command",
16          "command": "comparison.create_multiple_surface_comparison_on_cad"
17        }
18      ]
19    },
20    // ...
21  ]
22}
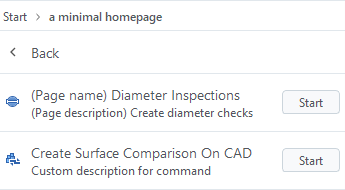
The MenuPage "homepage" provides two menu entries:
A NextPageEntry to the page
"create_diameter"An EmbeddedCommandPage for execution of the ZEISS INSPECT command
comparison.create_multiple_surface_comparison_on_cad
Note
The EmbeddedCommandPage is defined directly inside of the MenuPage, in place of a NextPageEntry pointing to it. The NextPageEntry is created implicitly. It will not have any title, description, or icon, but NextPageEntries actually take these from the page they point to if they don’t have their own, so we can just add them to the page instead.
 1{
 2  // ...
 3  "objects": [
 4    // ...
 5    {
 6      "type": "NextPageEntry",
 7      "name": "Minimal example",
 8      "description": "hook for example assistant",
 9      "page": "homepage",
10      "id": "hook_for_inspect",
11      "position": {
12        "insert": "inspect/inspection_home",
13        "before": ""
14      }
15    },
16    // ...
17  ]
18}

NextPageEntry “hook_for_inspect”
A NextPageEntry with its tags "name", "description" and "page" is defined (l. 6…8).
Our "homepage" is made reachable from the inspect Workflow Assistant page "inspection_home" by using the "position" tag (l. 11…14).
(The "inspect" Workflow Assistant definition is part of the ZEISS INSPECT System Apps. The alias we previously defined with "using" allows to reference it by name instead of ID.)
Hint
Alternatively, you can add a reference to one of the Workflow Assistant pages in the definition of a custom workspace. See AppExamples – WorkflowAssistants/workspaces/assistant/assistant.json for an example.
MenuPage “homepage”
Clicking the NextPageEntry "Minimal example" leads to the MenuPage "homepage".
 1{
 2  // ...
 3  "objects": [
 4    // ...
 5    {
 6      "type": "WizardPage",
 7      "id": "create_diameter",
 8      "name": "(Page name) Diameter Inspections",
 9      "description": "(Page description) Create diameter checks",
10      "icon": "cmd_inspect_diameter",
11      "steps": [
12        {
13          "type": "EmbeddedCommandStep",
14          "command": "primitive.cylinder_circle_quick_creation_draft",
15          "info": "Each step in a wizard references a command. An additional info box can be provided. The info box is separate for each command and may be omitted in each step (see next step)."
16        },
17        {
18          "type": "EmbeddedCommandStep",
19          "command": "internal.check_scalar_diameter"
20        }
21      ]
22    }
23  ]
24}
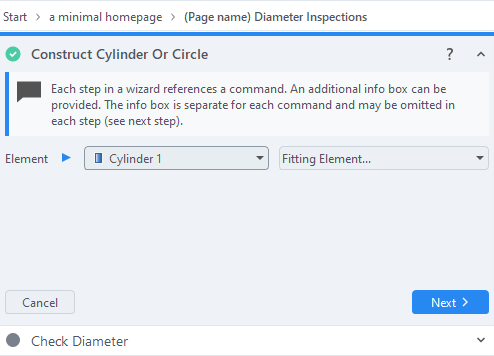
WizardPage “create_diameter” – Step 1
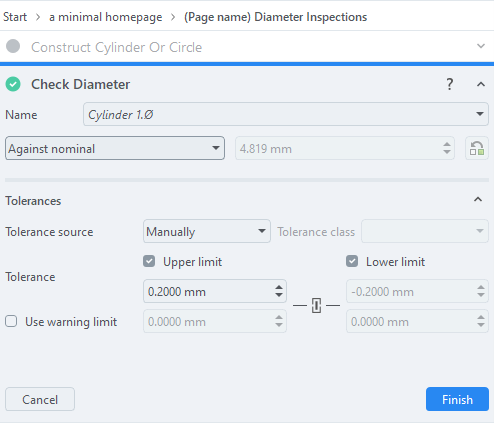
WizardPage “create_diameter” – Step 2
The last object of our “Minimal example” is the WizardPage "create_diameter". This page contains two subsequent wizard steps, both of which are EmbeddedCommandSteps. The first step allows to create a cylinder or circle while the second step allows to check the diameter of the newly created element. The next step can only be selected when the current step has been completed.
Hint
User-defined scripts are referenced in commands with the notation userscript.<scriptfile>. If the script is located in a subfolder of the App’s scripts/ folder, use the notation userscript.<folder>__<scriptfile>. (A double underscore is used as path separator. In <scriptfile>, the extension .py is omitted.)
Hint
Custom wizards can be implemented using the Wizard widget in user-defined scripts. See Wizard widget control for details and App Examples – WorkflowAssistants/scripts/workflows for a complete example.
Workflow Assistant JSON format
Note
Optional parameters are marked with ‘*’.
Common Workflow Assistant Object Attributes
These attributes are common for all Workflow Assistant objects listed in the following sections.
- type (String)
Workflow assistant object type identifier
Examples:"type": "MenuPage","type": "NextPageEntry"- id* (String)
Reference ID of this object
For pages the id is not optional and it is also a good idea to provide an id for menu entries that might be referenced by another definition.
Example:"id": "label_menu"- name* (String-like)
General name of object, default:
"<Default name>"
Use**"<home>"**as the name for the home page of a workspace. It will translate automatically (to"Start"in english and german).
Example:"name": "Object 1"- description* (String-like)
General description of the object
Example:"description": "this does something"- icon* (Icon-like)
Icon to be displayed
Example:"icon":"surface_section_menu"- position* (Object)
Insert the object at a specific position in an existing Workflow Assistant page
“insert” (id): Object to insert into
“before” (id): Position hint, i.e. insert before this object (may be empty)
Example:
{
  "insert" = "inspection_home",
  "before" = "inspection_menu"
}
Pages
MenuPage
Basic type of page which displays Menu entries in form of a list.
- entries (List of Menu Entries)
List of Menu entries. Each entry must be a valid JSON object describing a menu entry object.
Example:[ { entryA }, { entryB } ].
WizardPage
Page which displays multiple consecutive steps as a list of accordions with navigation buttons between them.
- steps (List of Wizard Steps)
List of WizardSteps, each entry should be a valid json object describing a WizardStep object.
Example:[ { entryA }, { entryB } ]
EmbeddedCommandPage
Page with an embedded command. The page ID is defined by the given command.
- command (string)
Command to execute, usually with a dialog.
Example:comparison.create_min_max_deviation_label,userscript.inspect_gaps
Wizard steps
EmbeddedCommandStep
A wizard allows to execute a sequence of commands. The command dialogs are embedded into the Workflow Assistant.
Note
One of the tags ‘command’ and/or ‘commands’ must exist.
- command (string)
Command to execute
Example:inspection.inspect_by_deviation_label- commands (List of Objects)
Each object in the list can either be
a string with the command
an object with the following keys:
“command”
“info”*
“info_help_id”*
“interactive”*
Example: [ commandA, commandB ]
- interactive* (boolean)
Defines whether to execute the command in interactive mode. Must be set to
Falsefor executing a user script, otherwise the dialog will be closed immediately. (Default: False)- info* (String-like)
Descriptive info text for this wizard step
Example:Compute statistics for deviation analysis on an inspection element with color deviation representation. Select an area on the color deviation representation with any of the point selection functions."- info_help_id* (string)
Reference to a help article in the ZEISS Quality Tech Guide
Example:"info_help_id": "cmd_comparison_create_min_max_deviation_label"
Advanced entry types
This section introduces some advanced data types for definition of strings and icons.
String-like entry
String
Plain string
Translated (Object)
Runtime-translated string, based on xliff files located in the App’s languages/ folder.
- translate (boolean)
Translate the string at runtime
- text (string)
Text to translate
- id (string)*
Automatically generated translate id
Icon-like entry
Icon-like entries can be defined in multiple ways listed below. They provide an icon to display as part of an object in the Workflow Assistant. Currently only .svg files are fully supported.
Simple (string)
Specifies how and where to load an icon from (see Advanced type below for more information about <path> and <mode>). Always uses “auto” dark mode setting.
"<path>" or "<mode>::<path>"
Example: “inspection_home” / "app::icons/workflow/my_icon.svg"
Advanced (object)
- path (string)
Path to an icon or value of icon (if using a decoder)
- mode* (string)
Mode to use to interpret the path. (default: “system”)
“system”: Loads a system icon with the given name. Example:
{"path": "inspection_home", "mode": "system"}“app”
Loads an icon from the originating App. The path is relative to the App’s root-folder. Example:
{"path": "icons/workflow/my_icon.svg"}Loads an icon from any App specified by an AddOnUrl. Example:
{"path": "acp:///b2cc0788-1a2b-4652-ba7e-3f789126006e/icons/workflow/my_icon.svg", "mode": "app"}
“file”: Loads an icon based on an absolute file path. Should be used with care (mostly while testing) due to poor portability. Example:
{"path": "C:\\Downloads\\my_icon.svg", "mode": "file"}“base64”: Decodes the icon from an embedded base64-encoded string. Example: {“path”: “PHN2ZyBpZD0iTGF5ZXJfMSI…”, “mode”: “base64”}
- dark (string)
Dark mode mode option. System icons ignore this setting.
“none”: Do not change icon in dark mode.
“auto”: Generate brightend version for darkmode automatically.