Custom nominal/actual elements
This documentation describes the creation of custom nominal or actual elements in ZEISS INSPECT using the Python Extensions API.
Geometric element types
A custom nominal or actual element is always of a certain geometric type, like a point, surface curve, mesh etc. After creation, a custom element can be used in the project like a predefined element, i.e. an element created by a predefined construction command.
Custom elements can depend on predefined elements and vice versa. An element recomputation is triggered if a dependency changes.
Note
For some custom element types only the actual variant exists.
Creating a custom element
To create a custom nominal or actual element, the general procedure is as follows:
If required, create a user-defined dialog for editing the element’s parameters.
Create a script in the App Editor or using Visual Studio Code.
Define a service based on the custom element’s script.
Start the custom element’s service via the Service Manager.
Create the custom element, either manually or from Python code.
Note
A dialog is not needed in cases where only non-interactive element creation is used.
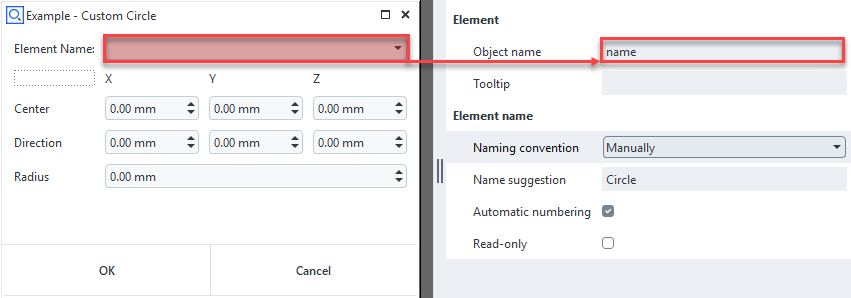
Dialog definition
The dialog must be defined in a dialog file (*.gdlg) as described in User-defined Dialogs.
The dialog must contain an Element name widget to set the custom element’s name. The element widget’s name must be set to name in the Dialog Editor.
Custom nominal or actual element script
All custom nominal or actual elements are based on the Extensions API. More specifically, a custom nominal or actual element class is inherited from the ScriptedElement base class.
 1import gom
 2import gom.api.extensions.actuals
 3from gom import apicontribution
 4
 5@apicontribution
 6class MinimalPointExample (gom.api.extensions.actuals.Point):
 7
 8    def __init__ (self):
 9        super ().__init__ (id='examples.custom_actual_point', description='Custom Actual Point')
10
11    def dialog (self, context, args):
12        return self.show_dialog (context, args, '/dialogs/Custom_Point.gdlg')
13
14    def compute (self, context, values):
15        return {
16            "value": (
17                float(values['point_x']),
18                float(values['point_y']),
19                float(values['point_z'])
20            )
21        }
22
23gom.run_api ()
- line 2…3:
Import custom element specific packages –
gom.api.extensions.nominalsfor nominal elements andgom.api.extensions.actualsfor actual elements.- line 5…6:
The class
MinimalPointExampleis inherited from gom.api.extensions.actuals.Point. The decorator@apicontributionallows to register the classMinimalPointExamplein the ZEISS INSPECT framework.- line 8…9:
The constructor calls the super class constructor while setting a unique contribution ID and a (human readable) description.
- line 11…12:
The
dialog()method allows to show the dialog when a custom element is created or edited.- line 14…21:
The
compute()method returns an element type specific dictionary of parameters. The dictionaryvaluescontains the dialog widgets’ object values. Numeric values are provided as strings, therefore a type conversion tofloatis done.- line 23:
gom.run_api()is executed when the script is started as a service.
Service definition
Add the service definition to the App’s metainfo.json file.
1"services": [
2    {
3        "endpoint": "gom.api.point",
4        "name": "Custom point",
5        "script": "Custom_Point.py"
6    }
7]
- line 3:
Service endpoint name
- line 4:
Service name
- line 5:
Custom element’s Python script path, relative to the App’s
scripts/folder
See Using service for details.
Start the service
Start the service using the Manage Services dialog (Apps ► Manage Services… in the ZEISS INSPECT main menu).
See Using services – Managing services for details.
Create custom elements interactively
Create custom elements by selecting the appropriate item from the Construct ► Script-Based Elements menu.
Caution
The custom element’s service must be running for creating an element.
Create custom elements from Python script
Create a custom element from a Python script by using function gom.script.scriptedelements.create_actual_draft() or gom.script.scriptedelements.create_nominal_draft(), respectively.
 1center_x = 1.0
 2center_y = 2.0
 3center_z = 3.0
 4dir_x = 4.0
 5dir_y = 5.0
 6dir_z = 6.0
 7radius = 42.0
 8
 9gom.script.scriptedelements.create_actual_draft (
10    """
11    Create a custom actual element
12    """
13    # Element ID as defined in its constructor
14    contribution='examples.custom_actual_circle',
15
16    # Optional: Set element name explicitly, otherwise the name is set automatically
17    # name='Test Circle 1',
18
19    # Set element type specific parameters
20    values={
21        'center_x': center_x, 'center_y': center_y, 'center_z': center_z,
22        'dir_x': dir_x, 'dir_y': dir_y, 'dir_z': dir_z, 'radius': radius
23    }
24)
Caution
The custom element’s service must be running for creating an element.
Advanced implementation patterns
Storing optional data with a scripted element
Additional data of any type can be stored using the data parameter of the computation result.
1    def compute (self, context, values):
2        return {
3            "value": (
4                float(values['point_x']),
5                float(values['point_y']),
6                float(values['point_z'])
7            ),
8            "data": "A string as optional element data"
9        }
Common computation function for actual/nominal element
In case both an actual and a nominal custom element are implemented, using a common computation function is recommended to avoid duplicate code.
 1import gom
 2import gom.api.extensions.actuals
 3import gom.api.extensions.nominals
 4
 5from gom import apicontribution
 6
 7def generate_point_element(point_x, point_y, point_z):
 8   """
 9   Generates a point
10
11   Params:
12   - point_x: x-coordinate
13   - point_y: y-coordinate
14   - point_z: z-coordinate
15
16   Returns:
17   - Dictionary with point's coordinate:
18   {
19       "value": (float(x-value), float(y-value), float(z-value))
20   }
21   """
22   result = {
23       "value": (
24           float(point_x),
25           float(point_y),
26           float(point_z)
27       )
28   }
29   return result
30
31@apicontribution
32class MyActualPoint (gom.api.extensions.actuals.Point):
33   """
34   Custom actual point element
35   """
36   def __init__ (self):
37       super ().__init__ (id='examples.custom_actual_point', description='Custom Actual Point')
38
39   def dialog (self, context, args):
40       return self.show_dialog (context, args, '/dialogs/Custom_Point.gdlg')
41
42   def compute (self, context, values):
43       return generate_point_element(
44           point_x=values['point_x'],
45           point_y=values['point_y'],
46           point_z=values['point_z'],
47       )
48
49@apicontribution
50class MyNominalPoint (gom.api.extensions.nominals.Point):
51   """
52   Custom nominal point element
53   """
54   def __init__ (self):
55       super ().__init__ (id='examples.custom_nominal_point', description='Custom Nominal Point')
56
57   def dialog (self, context, args):
58       return self.show_dialog (context, args, '/dialogs/Custom_Point.gdlg')
59
60   def compute (self, context, values):
61       return generate_point_element(
62           point_x=values['point_x'],
63           point_y=values['point_y'],
64           point_z=values['point_z'],
65       )
66
67gom.run_api ()
Creating log messages
Log messages can be created by using the method add_log_message().
1def compute (self, context, values):
2   self.add_log_message(context, 'info', f"{values=}")
3   # ...
Using an element selection filter
Some elements are created from other elements, which are selected with a Selection element widget. This widget provides a few options for selecting a specific element type, but in some cases a dedicated filter function has to be applied.
 1@apicontribution
 2class MyVolumeRegion (gom.api.extensions.actuals.VolumeRegion):
 3
 4    # ...
 5
 6    def element_filter(self, element):
 7        """
 8        Element type filter - see Selection element widget documentation
 9        """
10        try:
11            if element.type == 'linked_volume':
12                return True
13        except Exception as e:
14            pass
15        return False
16
17    def dialog (self, context, args):
18        dlg = gom.api.dialog.create (context, '/dialogs/Custom_Volume_Region.gdlg')
19        dlg.volume_ele.filter = self.element_filter
20        self.initialize_dialog(context, dlg, args)
21        return self.apply_dialog(args, gom.api.dialog.show(context, dlg))
- line 18…21:
gom.api.dialog.create ()returns the dialog object (dlg), which allows to access thevolume_elewidget object. For this purpose, the method show_dialog() used in the previous examples has been replaced by a sequence of other methods.
Using the dialog control widget and event handler
When implementing custom elements, the Control widget allows to show messages and to disable the ‘ok’ button in case any condition for creating an element is not met, e.g. not all parameters have been specified yet or the computation has failed for some reason.
 1@apicontribution
 2class MyOffsetPoint (gom.api.extensions.nominals.Point):
 3    """
 4    Provides a dialog handler for changing the control widget.
 5    Allows to show a computation error via the control widget's status and in ZEISS INSPECT's element properties.
 6    """
 7    def __init__ (self):
 8        super ().__init__ (id='examples.custom_nominal_point', description='Custom Nominal Point')
 9
10    def dialog (self, context, args):
11        self.dlg = gom.api.dialog.create (context, '/dialogs/Custom_Point.gdlg')
12        self.initialize_dialog(context, self.dlg, args)
13        res = self.apply_dialog(args, gom.api.dialog.show(context, self.dlg))
14        return res
15
16    def compute (self, context, values):
17        self.add_log_message(context, 'info', f"{values['base']=}")
18        return generate_point_element(
19            offset_x=values['offset_x'],
20            offset_y=values['offset_y'],
21            offset_z=values['offset_z'],
22            base=values['base']
23        )
24
25    def event(self, context, event_type, parameters):
26        self.add_log_message(context, 'info', f"{event_type=}")
27        self.add_log_message(context, 'info', f"{parameters=}")
28
29        if event_type == 'dialog::initialized':
30            self.dlg.control.ok.enabled = False
31            self.dlg.control.status = "Select base with 'center_coordinate'!"
32
33        if event_type == 'dialog::changed':
34            if parameters['values']['base'] is not None and \
35                hasattr(parameters['values']['base'], 'center_coordinate'):
36                self.dlg.control.ok.enabled = True
37                self.dlg.control.status = ''
Troubleshooting
Element Creation Issues
Dialog Doesn’t Open
Symptoms:
Menu item appears but clicking does nothing
No dialog window opens
Solutions:
Check dialog path: Use correct path from App root:
return self.show_dialog(context, args, '/dialogs/mydialog.gdlg')
Element Name widget: Ensure your dialog contains an Element Name widget with object name set to exactly
nameFile existence: Verify the dialog file exists in your App’s
dialogs/folder
Element Creation Fails
Symptoms:
Dialog opens and accepts input
Element appears with error state or creation fails entirely
Common Issues:
Invalid return format: Ensure
compute()method returns correct format:# For Point elements return {"value": (x, y, z)} # For Circle elements return { "value": { "center": (x, y, z), "direction": (dx, dy, dz), "radius": r } } # etc.
Type conversion errors: Convert dialog string inputs to appropriate types:
def compute(self, context, values):
    try:
        x = float(values['x'])
        y = float(values['y'])
        z = float(values['z'])
        return {"value": (x, y, z)}
    except (ValueError, KeyError) as e:
        self.add_log_message(context, 'error', f"Invalid input: {e}")
        raise
Missing parameters: Validate all required parameters are provided:
required_params = ['x', 'y', 'z']
for param in required_params:
    if param not in values:
        raise ValueError(f"Missing required parameter: {param}")
Performance Issues
Slow Element Creation
Symptoms:
Long delays when creating elements
UI becomes unresponsive
High CPU usage during element creation
Solutions:
Optimize computations: Avoid heavy calculations in the
compute()methodCache element properties: Don’t repeatedly access the same element properties:
# Inefficient
x = base_element.center_coordinate.x
y = base_element.center_coordinate.y

# Better
center = base_element.center_coordinate
x, y = center.x, center.y
Simplify dialog events: Avoid complex calculations in dialog event handlers
Dialog and Validation Issues
Dialog Control Problems
Symptoms:
Cannot enable OK button
Status messages don’t appear correctly
Dialog validation fails
Solutions:
Implement event handling: Use the
event()method to handle dialog state:def event(self, context, event_type, parameters): if event_type == 'dialog::initialized': self.dlg.control.ok.enabled = False self.dlg.control.status = "Please enter all required parameters" elif event_type == 'dialog::changed': # Validate inputs and enable/disable OK button if self.validate_inputs(parameters['values']): self.dlg.control.ok.enabled = True self.dlg.control.status = ""
Debugging Strategies
Enable Detailed Logging
Add logging to track execution and identify issues:
def compute(self, context, values):
    self.add_log_message(context, 'info', f"Starting computation with values: {values}")

    try:
        result = your_computation_logic(values)
        self.add_log_message(context, 'info', "Computation completed successfully")
        return result
    except Exception as e:
        self.add_log_message(context, 'error', f"Computation failed: {str(e)}")
        raise
Check Console Output
Always monitor the ZEISS INSPECT Service Manager for:
Python exceptions
Import errors
Service startup messages
Custom log messages
Test Incrementally
Start with the simplest possible element implementation
Add one feature at a time
Test each addition thoroughly before proceeding
Use existing examples as reference templates
Validate Early and Often
def compute(self, context, values):
    # Input validation
    if not values:
        raise ValueError("No input values provided")

    # Type validation
    for key, value in values.items():
        if value is None:
            raise ValueError(f"Parameter '{key}' cannot be None")

    # Proceed with computation...