Frequently asked questions
If you did not find an answer here, you might want to check ZEISS Quality Forum - Customizations & App Development.
Where are Apps located in the file system?
Apps which are edited are located in C:\Users\<USERID>\AppData\Roaming\GOM\<VERSION>\gom_edited_addons (or %APPDATA%\GOM\<VERSION>\gom_edited_addons, respectively). There is a subfolder for each App named by its UUID.
When editing is finished, an App file (see App file format) is created and saved in C:\Users\<USERID>\AppData\Roaming\GOM\<VERSION>\gom_addons.
The connected folders are saved as Windows shortcuts in C:\Users\<USERID>\AppData\Roaming\GOM\<VERSION>\gom_script_external_folders.
Where is the Python installation used by ZEISS INSPECT located?
Token: gom.app.python_directory
For GOM Inspect <= 2022:
C:\Program Files\GOM\<VERSION>\pythonFor ZEISS INSPECT >= 2023:
C:\Program Files\Zeiss\INSPECT\<VERSION>\python
The module search path also includes
C:\Program Files\Zeiss\INSPECT\<VERSION>\lib\python%APPDATA%\Python\<PYTHON_VERSION>\site-packagesFor each Python wheel used in an App:
%APPDATA%\gom\<VERSION>/gom_python_wheel_cache/<WHEEL>(see How are Python wheels handled by ZEISS INSPECT? for details)If an App is in editing mode:
%APPDATA%\gom\gom_edited_addons\<ADDON_UUID>\scriptswhere%APPDATAis expanded toC:\Users\<USERID>\AppData\Roaming.
You can print the module search path in an App using:
import sys

for p in sys.path:
	print(p)
How are Python wheels handled by ZEISS INSPECT?
ZEISS INSPECT maintains a cache folder for Python wheels and wheelhouses in %APPDATA%\gom\<VERSION>/gom_python_wheel_cache.
When a wheel/wheelhouse is installed in an App, it is copied into the App’s
scripts/modulesfolder and installed into the cache folder.When an App containing wheels/wheelhouses is installed, those are installed into the cache folder.
When a script from an App is started, its wheels/wheelhouses are installed into the cache folder. The script uses the cache folder named according to the wheel/wheelhouse filename in its
scripts/modulesfolder.
How can I install missing Python wheels by a script?
The following script tries to import the modules listed in required_modules. A ModuleNotFoundError exception is thrown if a module has not been installed into the App yet. In this case, the script will try to install it. The script has to be restarted in order to make any newly installed modules available.
import gom
import sys
import os
import subprocess
import importlib
# Put your Python modules here
# import <module> => [..., '<module>', ...]
# import <module> as <alias> => [..., [<module>, <alias>], ...]
required_modules = ['openpyxl', ['numpy', 'np']]
def install_modules(modules):
    module_installed = False

    # Build Add-on module installation path
    addon = gom.api.addons.get_current_addon()
    addon_id = addon.get_id()
    addon_path = os.path.join(gom.app.user_edited_addon_directory, addon_id, 'scripts', 'modules')

    for module in modules:
        try:
            if isinstance(module, str):
                print(f'import {module}')
                mname = module
                importlib.import_module(module)
            elif isinstance(module, list):
                globals_dict = globals()
                print(f'import {module[0]} as {module[1]}')
                mname = module[0]
                globals_dict[module[1]] = importlib.import_module(module[0])
            else:
                print(f"{module} has an unknown data type - expecting either '<module_name>' or '[<module_name>, <alias>]'")

        except ModuleNotFoundError:
            # sys.executable ensures that the ZEISS INSPECT Python installation is used
            res = subprocess.check_call(
                [sys.executable, '-m', 'pip', 'download', '--dest', addon_path, mname]
            )
            if (res == 0):
                module_installed = True
                gom.script.sys.update_addon_database()
            else:
                print(f"Attempt to install package {module} automatically failed.")
                sys.exit(1)

    if module_installed:
        print("---> Package installation successful, please restart script. <---")
        sys.exit(0)
install_modules(required_modules)
# Add your actual script here
How can I upgrade the pip version used in ZEISS INSPECT?
In rare cases, a certain Python package cannot be installed, because it requires a newer version of pip than currently installed with ZEISS INSPECT.
To upgrade pip:
Go into the ZEISS INSPECT Python folder
Run
.\python.exe -m pip install --upgrade pip
You can query the installed pip version with:
import pip
print(pip.__version__)
Caution
You are changing the pre-installed Python environment at your own risk!
How do I fix a unicode error when trying to access a file?
An error message such as SyntaxError: (unicode error) 'unicodeescape' codec can't decode bytes in position xx: truncated \UXXXXXXXX escape is cause by backslashes in a file system path. Always use forward slashes instead. See also ZEISS Quality Tech Guide: How Do I Select and Filter Files in Python Scripts.
How can I update the Apps after changes made outside of ZEISS INSPECT?
After creating, modifying or deleting an App outside of ZEISS INSPECT, you can use gom.script.sys.update_addon_database() to update the internal App database.
How can I stop script execution?
In a user defined dialog, you can call gom.script.sys.close_user_defined_dialog (dialog=\<your_dialog\>).
In general, you can use
import sys

# ...

sys.exit(0)
Can I use multithreading in Python scripts?
No, in general this is not possible. Due the Python Global Interpreter Lock, the ZEISS INSPECT App API was implemented non-thread-safe only and is called during script evaluation in the background on various occasions.
Depending on the specific use case, one of the following workarounds might be applicable:
Use a 3rd party library which makes use of threading natively.
Use the python subprocess module.
Use threads in a way that no ZEISS INSPECT API calls are made. You will have to find out if and how this works in your specific case.
Use a timer event to implement time-based scheduling in a dialog event handler.
How do I filter nominal, actual or inspection elements?
Use print (gom.app.project.<element_type>.__doc__) where you replace <element_type> by actual_elements, nominal_elements or inspection as needed to get the available properties.
To show all actual elements by name and type:
for element in gom.app.project.actual_elements:
    print (f'{element.name} - type: {element.type}')
You can create a loop in Python to iterate over the elements as shown above and apply a comparison to their attributes, but there is a faster solution!
The filter() method handles this far more efficiently!
Examples for filtering actual elements
group = gom.app.project.actual_elements

f = group.filter("is_selected", True)
print (f) # array of elements matching the filter criterion 'is_selected == True'

f = group.filter("type", "plane")
print (f) # array of elements matching the filter criterion 'type == Plane'
Examples for filtering nominal elements
group = gom.app.project.nominal_elements

f = group.filter("is_visible", True)
print (f) # array of elements matching the filter criterion 'is_visible == True'

f = group.filter("type", "cad")
print (f) # array of elements matching the filter criterion 'type == cad'
Examples for filtering inspection elements
group = gom.app.project.inspection

f = group.filter("is_element_modified_since_import", True)
print (f) # array of elements matching the filter criterion 'is_element_modified_since_import == True'

f = group.filter("type", "cad")
print (f) # array of elements matching the filter criterion 'type == surface_comparison'
How can I access the coordinates of a selection on a mesh?
The token gom.app.project.parts['<part name>'].actual.selection.coordinate provides a gom.Array of the selected vertices. Likewise, gom.app.project.parts['<part name>'].actual.selection.normal gives the corresponding normals and gom.app.project.parts['<part name>'].actual.selection.triangle the triangles defining the mesh.
import gom
import numpy as np

print(gom.app.project.parts['Training Object'].actual.selection.coordinate)
# Output: gom.Array (element=gom.app.project.parts['Training Object'].actual.selection.coordinate, shape=(1, 1343, 3))

print(gom.app.project.parts['Training Object'].actual.selection.normal)
# Output: gom.Array (element=gom.app.project.parts['Training Object'].actual.selection.normal, shape=(1, 1343, 3))

# Typically a numpy-array is used for further processing
selection = np.array(gom.app.project.parts['Training Object'].actual.selection.coordinate)

print(selection.shape)
# Output: (1, 1343, 3)

print(selection)
# Output:
# [[[-2.41255735e+01  2.21117734e+01 -1.91864308e+01]
#  [-2.45970797e+01  2.21050666e+01 -1.97100373e+01]
#  [-2.81128953e+01  2.20834014e+01 -2.04692317e+01]
#  ...
#  [-3.93854225e+01  2.09585465e+01  8.64908297e-02]
#  [-3.96552365e+01  2.10394088e+01  3.26750288e-03]
#  [-4.00649288e+01  2.07525728e+01  7.25684079e-02]]]
This can be used to create a scripted surface element from a selection.
Warning
The triangles returned by gom.app.project.parts['<part name>'].actual.selection.triangle are provided as indices to vertices of the global mesh. The helper function localize_triangles remaps these indices to vertices of the local (selected) mesh.
How do I check if a dialog was closed with ‘Ok’, ‘Yes’/’No’ or ‘Close’, respectively? (And not with ‘Cancel’ or by closing the dialog window.)
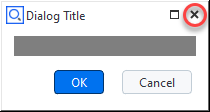
Closing a dialog window or pressing the ‘Cancel’ button raises a gom.BreakError exception. To check if any type of dialog was closed via the window close control (see figure) or via the ‘Cancel’ button (in case of the ‘Ok/Cancel’ dialog type), use the following code:
try:
	RESULT = gom.script.sys.show_user_defined_dialog (dialog=DIALOG)
except gom.BreakError as e:
	print("Dialog window was closed or 'Cancel' button was pressed")
else:
	print("'Ok' button was pressed")
How can I retrieve dialog results as a Python dictionary?
print (RESULT.__dict__['__args__'][0])
# example output: {'distance': 2.0, 'label': None}
See User-defined dialogs / Executing dialogs / Dialog results for more details.
How can I use an image from a script resource file in a user defined dialog?
You add your image file as a resource to the App:
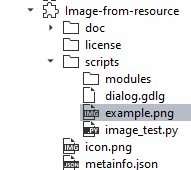
You create a dialog file with an Image widget, but without setting the actual image in the dialog editor.
In the Python script, you assign the resource as data to the image widget object:
import gom

DIALOG=gom.script.sys.create_user_defined_dialog (file='dialog.gdlg')

#
# Event handler function called if anything happens inside of the dialog
#
def dialog_event_handler (widget):
	pass

DIALOG.handler = dialog_event_handler

DIALOG.image.data = gom.app.resource[":example.png"]

RESULT=gom.script.sys.show_user_defined_dialog (dialog=DIALOG)
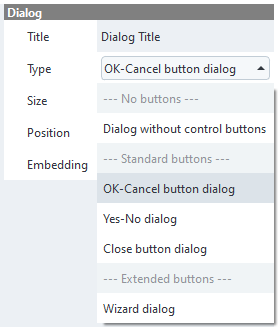
How can I convert an embedded XML dialog definition into JSON format (optionally as separate file)?
Ensure that the dialog command line is identical to how the app editor would create it, i.e.
DIALOG=gom.script.sys.create_user_defined_dialog (content=...Double-click the XML text to open the Dialog Editor (only works if you did 1.)
Close the Dialog Editor with ‘Ok’ to convert the XML to the newer JSON representation embedded in the script
Optional: On the JSON representation: RMB ► Tools ► Convert Dialog To .gdlg File
How can I get the position of a label and apply it to another label?
You can use gom.script.cad.set_label_position() to set the offset of the new label to the offset of the old label:
label_old = gom.app.project.inspection['Surface comparison 1'].deviation_label['Surface comparison 1.1']
label_new =gom.app.project.inspection['Surface comparison 1'].deviation_label['Surface comparison 1.2']

gom.script.cad.set_label_position(elements = [label_new], offset = label_old.label_offset_in_3d_view)
offset has the type gom.Vec3d.
How can I conditionally set the label (border) color?
In the label properties, you can create a new label template and change the background color to ‘dynamic’. This allows to add an expression in a Python-like syntax, e.g.
if result_dimension < result_dimension.upper_tolerance_limit:
    return color('#00ff5e')
else:
    return color('#ff0000')
See also ZEISS Quality Tech Guide: Edit Expression (label background color).
How do I check if the sensor warm-up is completed or how long it will take, respectively?
remaining_warmup_time_in_seconds = gom.script.atos.wait_for_sensor_warmup (timeout = my_timeout)
The function blocks until the sensor is ready or the timeout specified with my_timeout occurs.
How can I obtain the measurement quality?
The measurement quality is shown in the Explorer tab ‘Measurements’:
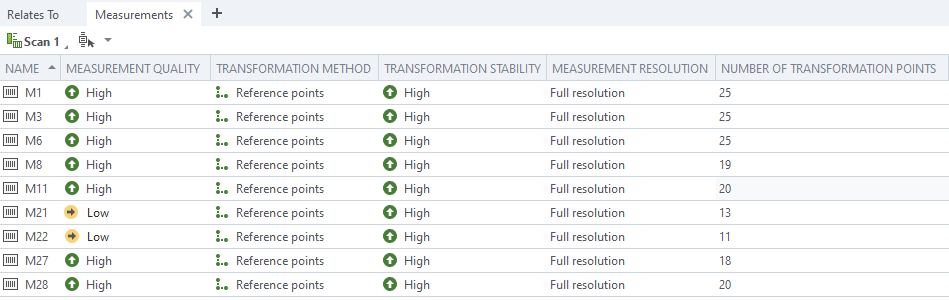
Use the token explorer_measurement_quality to obtain the same information via script, e.g.
measurement_quality = gom.app.project.measurement_series['Scan 1'].measurements['M1'].explorer_measurement_quality
How can I get the CT scanner’s system status — including cathode operation time?
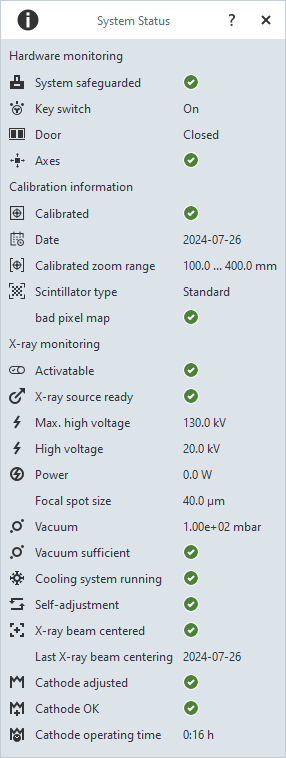
The command gom.script.ct.get_system_status() provides the same information as the System Status dialog. The actual content depends on the CT scanner model.
Example (ZEISS METROTOM 1):
print(gom.script.ct.get_system_status())
# Example output:
# {'cathode_operation_time': 1727372, 'high_voltage_in_kv': 0.0, 'is_activatable': True,
# 'is_cooling_system_running': True, 'is_key_switch_ok': True, 'is_self_adjustment_running': False,
# 'is_system_safeguarded': True, 'is_xray_source_ready': True, 'max_high_voltage_in_kv': 160.0,
# 'power_in_w': 0.0}
cathode_operation_time is given in seconds.
(Added in SW2023 Service Pack2)
Can I use the Python package pdfplumber in an App?
Yes, pdfplumber can be installed with the Python Package Installer and used without any known limitations.
Can I use the Python package pywin32 in an App?
Yes, but pywin32 requires a workaround due to a limitation in ZEISS INSPECT’s wheel cache.
Root cause
ZEISS INSPECT installs Python wheels into a cache folder but does not process .pth files in that directory. Since pywin32 relies on pywin32.pth to:
Add
win32\,win32\lib\,Pythonwin\tosys.pathRun
pywin32_bootstrap.py, which callsos.add_dll_directory()onpywin32_system32\(containingpywintypes<VER>.dll,pythoncom<VER>.dll)
…a plain import win32api or import pywintypes fails with:
ModuleNotFoundError: No module named 'pywintypes'
Workaround
Call a setup function before any pywin32-dependent import. The function replicates what pywin32.pth and pywin32_bootstrap.py would normally do:
import gom
import gom.api.addons
import glob
import os
import sys

def setup_pywin32():
    """
    Set up pywin32 DLL path and sys.path entries manually,
    because ZEISS INSPECT's wheel cache does not process .pth files.
    """
    if 'pywintypes' in sys.modules:
        return  # already set up

    addon = gom.api.addons.get_current_addon()

    # Find pywin32 wheel filename from the App's scripts/modules/ folder
    if addon.is_edited():
        addon_dir = addon.get_file()
        matches = glob.glob(os.path.join(addon_dir, 'scripts', 'modules', 'pywin32-*.whl'))
    else:
        matches = [
            f for f in addon.get_file_list()
            if 'scripts/modules/pywin32-' in f.replace('\\', '/') and f.endswith('.whl')
        ]

    if not matches:
        raise RuntimeError("pywin32 wheel not found in App's scripts/modules/")

    wheel_stem = os.path.splitext(os.path.basename(matches[0]))[0]

    # Locate the wheel cache directory (glob handles any ZEISS INSPECT version)
    cache_dirs = glob.glob(
        os.path.join(os.environ['APPDATA'], 'gom', '*', 'gom_python_wheel_cache', wheel_stem)
    )
    if not cache_dirs:
        raise RuntimeError(f"pywin32 wheel cache directory not found for: {wheel_stem}")

    cache_dir = cache_dirs[0]

    # 1. Add DLL search path for pywintypes<VER>.dll and pythoncom<VER>.dll
    os.add_dll_directory(os.path.join(cache_dir, 'pywin32_system32'))

    # 2. Add win32, win32\lib, Pythonwin to sys.path
    for sub in ('win32', os.path.join('win32', 'lib'), 'Pythonwin'):
        p = os.path.join(cache_dir, sub)
        if p not in sys.path:
            sys.path.insert(0, p)

# Call setup_pywin32() BEFORE any pywin32-dependent import
setup_pywin32()

import win32api  # now works
Installing the pywin32 wheel
Install pywin32 into the App’s scripts/modules/ folder using the App Editor’s Install Python Packages dialog (RMB on the scripts or modules folder ► Install Python Packages…). The App Editor automatically selects the wheel compatible with the Python version used by ZEISS INSPECT.
See also the Pywin32Example App example.
Note
Some Python packages (such as xlwings) require pywin32.
Can I use xlwings in an App?
xlwings depends on pywin32 for Windows COM automation. With the workaround described in Can I use the Python package pywin32 in an App?, pywin32 can be made available, so xlwings may work — provided that Microsoft Excel is installed on the same machine.
Note
xlwings requires Microsoft Excel. If Excel is not installed, xlwings will fail regardless of the pywin32 setup.
If Excel compatibility is not required, openpyxl is the recommended alternative for reading and writing Excel files (see Excel import/export example).
How do I use a C# / .NET library in an App?
First you have to install the Python.NET package in your App.
Here is a simple C# library source code example:
namespace MyDotNetClassLib
{
    public class Adder
    {
        public string className = "Adder";
        public static int StaticAdd(int left, int right)
        {
            return left + right;
        }
        public int Add(int left, int right)
        {
            return left + right;
        }
    }
}
This code has been compiled into the library MyDotNetClassLib.dll.
The following example Python script uses methods and members of this library:
import gom
import clr # .NET Common Language Runtime (provided by Python.NET package)
from System import Console

import sys
sys.path.append('.')                   # append path to the DLL file
clr.AddReference("MyDotNetClassLib")   # name of the assembly (usually the DLL filename without extension .dll)
from MyDotNetClassLib import Adder     # import the module (the C# namespace)

print()
print("hello from python")

# execute a C# function
Console.WriteLine("hello from C#")

# call the static method StaticAdd() of class Adder from our MyDotNetClassLib library
print(f"My C# Adder.StaticAdd(1,2): {Adder.StaticAdd(1,2)}")

# create an object of the class Adder...
adder = Adder()

# ... call its Add() method
print(f"My C# adder.Add(3,4): {adder.Add(3,4)}")

# ... read the member variable className
print(f"My C# adder.className: {adder.className}")

# ... write and read back the member variable className
adder.className = "Renamed Adder"
print(f"My C# adder.className: {adder.className}")
This example is based on Stack Overflow: “Calling a C# library from python”.
See Python.NET documentation for more details.